You are here: Administrator Help > Administrator Tools > Code Table Partitioning

Code Table Partitioning

Code partitioning allows administrators to filter the choices available to users in a particular field based off the value of another field. For example, in the Events snap-in, code partitioning could be used to make the choices in the Location field reflect the value selected in the Type field. If a user selected "Substance Abuse" in the Type field, only locations related to substance abuse would be displayed in the Location field, while if they selected "Driver Improvement," only locations related to that type of event would be displayed, etc. The combinations are as versatile as the rules you use. Code table partitioning can affect any snap-in on the user end.

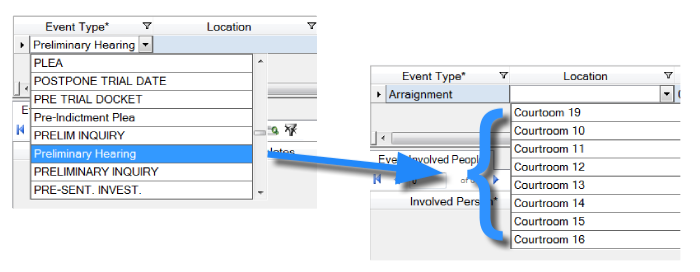
In this example of code partitioning, menu options for a Location field are filtered by the selection from the Event Type field. Only locations relevant to the Preliminary Hearing event type are displayed in the drop-down menu for Location. Courtrooms 1-9 and 17-18 are not used for preliminary hearings, so they do not appear.

Code partitioning is extremely helpful in integrated justice environments. Rather than having to sort through all the codes that are being used by different organizations, users are only presented with options that are relevant to their organization.

Creating Code Partitioning

  1. Navigate to the code partitioning code table by clicking System Administration in the Administrative Tools section of the Explorer Toolbar, and then clicking Tools | Code Partitioning.

    Tip: To access this code table through the Code Tables link in the Administrative Tools group rather than the System Administration link in the same group, click ctblCodePartitionInclusion.

    The Code Partitioning session includes three snap-ins: the Sessions snap-in (used to narrow down the snap-ins available in the Code Partition Rules snap-in), the Code Partition Rules snap-in (used to select the snap-ins and fields to partition), and the Code Partition Inclusions snap-in (used to specify which options will appear in the drop-down menus for the fields specified in the Code Partition Rules snap-in).


  2. In the Sessions snap-in, select the session name of the snap-in you wish to partition. The code partitioning rule you configure in the following steps will be applied to the selected session.

    Note: To have the code partition rule apply to pop-up reminders, the default view session must be selected.

    If you want the code partitioning to be applied to another session (or multiple other sessions), configure the code partitioning settings using the following steps, and then click Copy Record to copy these settings to other sessions. Copy Record only works if the session you are copying the code partitioning rule to contains the same snap-ins and fields as the session you are copying from.

  3. Click the Code Partition Rules snap-in.
  4. Add a new record.

  5. Complete the fields, as described below:
    Filter Snap-inSelect the snap-in that you wish to partition from the drop-down list.
    Filter FieldSelect the field that you wish to specify inclusions for from the drop-down list. After making a selection, the Filters list in the Code Partition Inclusions snap-in will be populated.
    Allow Snap-inSelect the dependent or filtering snap-in from the drop-down list. You must either select the same snap-in for both the Filter Snap-in and the Allow Snap-in fields, or select an Allow Snap-in that has a foreign key to the Filter Snap-in.
    Allow Field

    Select the dependent or filtering field from the list. After making a selection, the Allows list in the Code Partition Inclusions snap-in will be populated.

    NotesType any related notes in this free-text field.
  6. In the Code Partition Inclusions snap-in, select a field from the Filters list. The allowed fields must be set for every filter field.

    Tip: You can Control+Click each desired filter field to manage multiple fields, or Shift+Click to select entire ranges.

  7. Select the allowed fields in the Allows list. All the selected check boxes are fields that will be allowed when the filter field is selected in JustWare.

    Tip: You can use the Select All and Unselect All buttons to manage your check box selections.

  8. Save the session.

The specified snap-in fields are now partitioned to filter only the desired menu options.


Using the "Agency of Current User" Filter

In the Filter Snap-in field of the Code Partition Rules snap-in, you will see the Agency of Current User option. If selected, Agency of Current User will be the only option in the Filter Field menu. This option allows the filtering of menu options based on the user's agency. Setting code partitioning with this option is useful for multiple agencies using the same JustWare database. Users in different agencies would have access only to their own agency's menu options .